Preparing pencil sketches using Channels in PhotoShop

First off I’d like to start off with a quote from one of my instructors in college about working in Adobe PhotoShop. He said “There are a thousand ways to solve the same problem in PhotoShop”. This statement is 100% true. I know there are so many other ways to accomplish a nice clean line drawing but here is the way I’ve found that works best for my work flow.
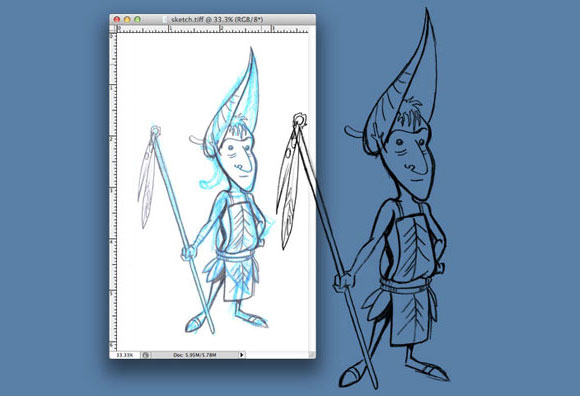
When starting its best to understand how you work. For me, I do my pencil sketches with a blue non-photo reproducing colored pencil. It helps me get the gesture of the drawing down before going in with a pencil to tighten up my lines. Knowing that I scan my sketches in color (RGB) at 300 DPI or PPI. I know some artists also use red colored pencils for their under drawings and this process can also be done with a red colored pencil but for this tutorial I’m going to just concentrate on removing the blue line. Now that the sketch is scanned and saved to my computer, I open it in PhotoShop.
Having started with a blue line I need to now remove it. I start by adjusting the hue/saturation (Image > Adjustments > hue/saturation) With the hue/saturation dialog panel up you will see a drop down menu set to “Master”. On the “Master” setting drop the saturation all the way down to -100. Then go to both the “Cyan” setting and “Blue” setting and adjust the brightness all the way up to +100. Now to adjust the levels of the drawing (Image > Adjustment > Levels) until the image looks right. One of the goals of this is to get a nice crisp white background.
To get the gray lines on their own layer there are many ways to do this. For instance, you could create a duplicate layer of your sketch and change the layer blend mode to “Multiply” and paint on a layer underneath. This way works fine but when I’m coloring I like to have control of all my lines and its hard when the drawing is surrounded by white. You will see why in a few steps.
Next go to your channels panel which PhotoShop defaults to the lower right hand corner and tucks it behind the layers panel or it can be opened from the window menu (Window > Channels). On the Channels Panel there should be four icons running along the bottom of the panel. The left most icon is the “load channel as selection” button (it should look like a dashed circle) and what it does for your line art is select all the white on the image. So if you have an area that is 100% black it would select nothing. Anything lighter then that it makes a % of a selection (Sorry this is starting to get a little technical but I think its good information to know).
You should now have the running ants around the outside of your drawing. Now inverse the selection (Select > Inverse). This is key because remember the white was selected and we want the black. Now Create a new layer and select a fill color (I normally go with black for now) and go to the fill dialog box (Edit > Fill). Make sure the opacity is at 100% and click “ok”. The image should look pretty close to the sketch you had before but with no white surrounding it. At this point, I like to fill the background layer with white to remove the old sketch that was incased by white. Of course, the background color doesn’t need to be white it can be any color desired.
If the line work is to light I usually duplicate the layer as many times as needed till I get the drawing the shade I want. Then merge the duplicate layers. Now to get the cleanest drawing possible (this last step is for the artist that wants everything nice and clean, which I do), I add a Layer style to the image. The Layer style will let me see unwanted smudges or stray lines. Double-click the layer with your drawing on it and add a Stroke (which is located on the left column at the bottom of the Layer style dialog box). With the stroke applied you can see all the errant lines and smudges you may have made. Use the lasso tool or the eraser and remove any unwanted lines. Once the cleanup is complete delete the layer style.
At this point the drawing should be ready for coloring. Wow, this was a long tutorial but I promise you once you get it down it goes very quickly.
Comments are closed.


